Showing posts with label Organization. Show all posts

Monday, June 4, 2012

Week 22 Assignment - More Organizing!!

Well, it looks like the Spring Cleaning Bug has bitten me too!  So this week I'm going to tackle my "Craft Closet"...a.k.a. The Little Princess's Bedroom Closet.  Currently, her closet is home to not only her clothes, but most of my Craft Crap, Photo Albums, Cameras, Office Supplies, and pretty much anything else I couldn't find a home for.  So this week, I'm going to try and get it organized and under control!  I did find some inspiration on Pinterest...

This is my personal favorite...I have a TON of fabric and it is currently in piles on the closet floor.  I just happened to buy a bunch of clip hangers at the Dollar Store the other day...

This one has me pretty excited too...especially since I'm about to buy a bunch of ribbon to make Princess Wands and Crowns for the Little Princess's birthday!  I wonder if the left over basket I have from my Pantry Make Over will work???

For the rest of my small, miscellaneous Craft Crap, I'm thinking of using this rolling plastic drawer set like this that I found in our side yard...guess the Hubs used to use it for work.

And if I can figure it out...I'm going to try something like this for my mountain of punches...

Guess it's official...Spring has Sprung!!  :)  Let's hope the Bug doesn't wear off any time soon!  Wish me luck and see you next week!!

Week 21 Results - Just a bit off target!

Well, as usual my week was hijacked...but this time not by the small pint-sized terrorists that I live with, but by the Hubs!  The Spring Cleaning Bug bit him hard this week which is evident in our New and Improved Garage!!  What once was a horror scene straight out of Hoarders is now a respectable two car garage that you can almost park a car in!  :)

In his fervor,  he had a bit of a melt-down while trying to grab a snack from our pantry.  As bags of chips, cereal, and marshmallows fell on him as he opened the pantry doors, he looked at me with a forlorn look on his face and asked "Think it's time to organize the pantry?"

How could I possibly say "no" to that??  :)  As fate would have it, I recently pinned just such a project from The Social Home,  so armed with some fabulous ideas and a heap of optimism I headed for the Dollar Store!!

Let me start by saying...Canada has WAY BETTER Dollar Stores than we do in the good old U.S. of A!!  Armed with my list of pantry goodies I hit both the 99 Cent Only and Dollar Tree stores only to be sadly disappointed!  Other than some rectangular tupperware, small canisters, and small green baskets, I didn't find much of what I needed.  I needed HUGE storage bins and baskets (we are Costco Shoppers after all!!) but came up with nothing.  :(  Instead of boarding a plane to Canada, I opted to make a B-line to my local Smart & Final.  There I found exactly what I needed in the huge storage bin arena, and while they weren't a dollar, they were far less expensive there than anywhere else.

Once I got my containers in order and filled, I made cute labels using Word and my new go-to labels, the Avery 6575 Permanent Labels.  As usual...I can't figure out how to share my templates without losing all the formatting, so if you want them let me know and I'll e-mail them to you.

A quick trip to Kinko's to print them out and viola...
I keep going to the pantry and opening it just to look at it!!  I am absolutely giddy over how much better it looks, and that I can actually find things quickly and easily!!  Oh, and nothing falls out when you open it either!!  Woo hoo!!  Now that I've tackled the pantry...what else can I organize around here??  :)

Monday, February 6, 2012

Week 5 Assignment - Results

It's a good thing I decided to take it easy this week...I was definitely not in the zone!  :)  But I did manage to finish my projects, despite the fact that I think I spent more time planning my next months worth of projects.  Guess that's why I'm blogging to keep me on track!


The bread box was more of a challenge than I thought it would be...it was determined to remain a blonde, but I was more determined to make it a brunette!!  While sanding it down to prepare it for staining, I realized it wasn't solid wood but was veneer instead.  I tried staining a small bit on the back but it just wouldn't take...so I resorted to primer and spray paint.  I had some leftover Espresso spray paint from my Family Sign assignment which did the trick...but I still wasn't in love with it.  So I played around with some Black Antiquing Glaze and ta da!!  Not what I had in mind exactly but it will do.  Take a look...


A couple of tricks I learned:
1)  Have the folks at the Depot cut your MDF to a size slightly larger than the interior of your bread box.  That way you can sand down the edges as needed for a tight fit.
2)  For the notches in the MDF for the cords, I used a straight edge and a box cutter.  It was time consuming but gave me nice, straight edges for the openings.  Do this BEFORE painting your MDF.


I love the fact that I don't have a bunch of charging cords slinking around my kitchen counter!!  Definitely worth the effort!

And our Mommy Play Date was sooo much fun!!  I think we may have had more fun than the kids!  We had to get a little creative with my planter box because my window sill where I wanted to put it was only 4" wide, but we found some Alder 1/4" x 6" sheets that did the trick.  Terri was making hers for her mantle so she was able to use 1" x 6"s in Pine.  I was amazed at how easy these were to make...even if you don't have access to power tools!  Most home improvement stores will cut wood to your specifications (within reason) so all you need to do is drill a few holes and install a few screws.  I think the hardest part was drinking all the frappuccinos!  


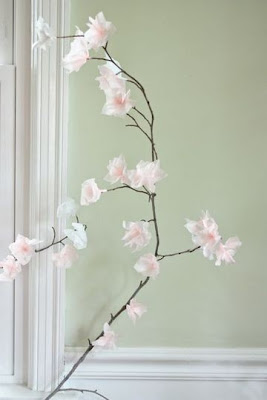
Now to fill those lovely frappuccino bottles, I decided I wanted the look of cherry blossoms...but I HATED how the stems looked on the silk ones I found.  But not to fear, Pinterest is here!!  Found this pin on one of Tracy's boards from Apartment Therapy  and went to work...


Easy?...YES!! Tedious?...ABSOLUTELY!!  You may notice that I only finished 3 of the 5 branches.  This is because I decided to stop before poking my eyes out with my scissors!  :)  I can't imagine how this woman did a whole room of them??  I think this is a project best completed with friends and accompanied by your favorite beverage!  So I will take a little break and maybe finish the last two branches with a Blue Moon!  Anyway...here's what I've done so far...
Now that I've taken a week off...guess it's time to get back to work!  

Monday, January 30, 2012

Week 5 Assignment - More Organization and Power Tool Fun

After last weeks DIY-a-thon, I think I'm going to take it easy this week...but I still have a couple of projects up my sleeve!

First, I'm going to get rid of the charger cord disaster that is my kitchen counter thanks to an idea I found on Pinterest from Better Homes and Gardens.
The bread box they show in the picture retails for around $70...and I couldn't find another stainless steel one that didn't look HUGE, so off to eBay I went and found this little wonder.
I'm hoping I can sand it and stain it the color of our kitchen cabinets...maybe with a little black glaze just for fun.  Wish me luck!

I'm also going to take advantage of my good friend Tracy and her power tools again to make this planter box from Shanty 2 Chic for my kitchen window sill.
There's a pretty funny story behind this one!  One of my closest friends, Terri, made a comment to Tracy (Bob Vila with Boobs) at my birthday party a couple of weeks back that it wasn't fair that I got to take advantage of all of Tracy's Built-It-Yourself-Talents because I lived closer to Tracy than she did.  So Tracy, being Tracy, offered to help both of us build this when she saw we both pinned it on Pinterest.  Final result of the conversation...Terri is coming down with her kids on Friday for a dual play date at my house!  Her kids and mine will play with eachother while Terri, Tracy and I play with saws!  :)  I can't wait!

Monday, January 9, 2012

Week 1 Assignment - Results

One week in and I'm on a roll!  These fabric covered crates turned out to be super easy and totally adorable!  The hardest part was finding the crates...I ended up finding crates at Walmart ($5/each) but they were a different size than Laura's.  Luckily, she includes instructions on how to adapt her pattern to any size crate!!  If you are interested, here is the link to her Button Top Brad tutorial since there isn't a link in her crate cover tutorial.  Also, SUPER easy and really help keep the covers from being removed by your little helpers!   A couple of other pointers...

1)  Don't buy or cut your fabric until you get your crates...you may need to adjust your measurements based on the crates you get.
2)  Cut and sew one cover to make sure it fits before cutting the fabric for any additional covers.
3)  If find you are intimidated by her "boxing the corners" don't be...just trust her and give it a try. It didn't make any sense to me until I actually did it.  :)

So without further adieu...here's the finished product.

Sunday, January 1, 2012

Week 1 Assignment - Getting Organized

Well, now that the new year is here, my first assignment is to try and get the toy situation in our house under control.  Since Christmas our house has looked like a Toys R Us threw up all over it and enough is enough!  :)  I found this project on Pinterest and I think it's a winner!

Currently our kids, Bradan (4) and Brenna (2) have separate rooms, but we are thinking of moving them into the same room and making the other bedroom a "playroom" (that being said...if anyone has any insight/advice on room sharing I'd love to hear it!) so I plan on making Bradan's in a blue and brown theme (which matches his current room) and Brenna's pink and brown (which matches hers) so if we do combine rooms they will coordinate well.  I found this fabulous tutorial from Laura Gunn at Paint in My Hair so I'm hoping it ends up being as easy as it sounds!  Wish me luck!!  See you next week!