Well, as usual my week was hijacked...but this time not by the small pint-sized terrorists that I live with, but by the Hubs! The Spring Cleaning Bug bit him hard this week which is evident in our New and Improved Garage!! What once was a horror scene straight out of Hoarders is now a respectable two car garage that you can almost park a car in! :)
In his fervor, he had a bit of a melt-down while trying to grab a snack from our pantry. As bags of chips, cereal, and marshmallows fell on him as he opened the pantry doors, he looked at me with a forlorn look on his face and asked "Think it's time to organize the pantry?"
How could I possibly say "no" to that?? :) As fate would have it, I recently pinned just such a project from The Social Home, so armed with some fabulous ideas and a heap of optimism I headed for the Dollar Store!!
Let me start by saying...Canada has WAY BETTER Dollar Stores than we do in the good old U.S. of A!! Armed with my list of pantry goodies I hit both the 99 Cent Only and Dollar Tree stores only to be sadly disappointed! Other than some rectangular tupperware, small canisters, and small green baskets, I didn't find much of what I needed. I needed HUGE storage bins and baskets (we are Costco Shoppers after all!!) but came up with nothing. :( Instead of boarding a plane to Canada, I opted to make a B-line to my local Smart & Final. There I found exactly what I needed in the huge storage bin arena, and while they weren't a dollar, they were far less expensive there than anywhere else.
Once I got my containers in order and filled, I made cute labels using Word and my new go-to labels, the Avery 6575 Permanent Labels. As usual...I can't figure out how to share my templates without losing all the formatting, so if you want them let me know and I'll e-mail them to you.
A quick trip to Kinko's to print them out and viola...
I keep going to the pantry and opening it just to look at it!! I am absolutely giddy over how much better it looks, and that I can actually find things quickly and easily!! Oh, and nothing falls out when you open it either!! Woo hoo!! Now that I've tackled the pantry...what else can I organize around here?? :)
My New Year's Resolution for 2012 has been made...and I'm blogging to help me stick to it! Every week I will assign myself a DIY project (home improvement, craft, or whatever else catches my eye) and will share my progress with you. I hope you enjoy the journey with me!
Showing posts with label Results. Show all posts
Monday, June 4, 2012
Friday, May 25, 2012
Week 20 Assignment - Results
Well, what can I say...I HATE cleaning! I am definitely not the Domestic Diva I thought I would be when we decided that I should stay home with the kids! But the good news is, I think I may have found a few tricks to help me fake it!!
After cleaning my disgusting floors with my go-to favorite...my Bona Hardwood Floor Mop and Cleaning Solution, I gave Ask Anna's fake-out a try! And I have to say, I was surprised at how well it worked!! The majority of my floor issues are the result of sippy cup spills, so going around once a day with a hand towel really does the trick! This, coupled with my Roomba dependency may just help me look like I spend a ton of time keeping my floors clean!! If you have hardwood (or fake hardwood like we do) it's definitely worth a try!!
Now...on to the bathrooms! Eeeww! I honestly have no idea how two toddlers and a grown man can make such a mess just going potty...and it's a total toss up as to who is the worst offender! :) On the bright side, ALL of my tricks that I picked worked even better than I had imagined! I highly recommend them all!! And the best part is, they all utilize the same concepts and ingredients, so doing them all takes very little time compared to the amazing results!! I tried them in this order and was able to bang out two bathrooms in under an hour. Considering how gross they were at the start I think that's quite an accomplishment!! :)
I stated with Joyful Homemaking's tip for removing mineral deposits around faucets...I just wrapped the faucets in both bathrooms in paper towels soaked in vinegar and let them sit until I was done with just about everything else. After I took off the towels I gave a little scrub to any deposits that were left and viola!! My faucets look brand new and shiny!! It even took the caked on deposits on the faucets themselves. I'll definitely be doing this once a month!!
Next, I gave Ask Anna's tip to get rid of that "Boy Bathroom Smell" a whirl! I used a sponge paintbrush to pretty much coat both toilets from top to bottom as well as on the floor around the toilets with the lemon/baking soda paste and let it set. Once I finished the second toilet I went back and sprayed the first with vinegar, as well as the walls and cabinet sides around the toilet. While that fizzed, I did the same to the second toilet. Then, back to toilet #1 to wipe everything down, followed by toilet #2. The result??? Two bathrooms that smelled clean and fresh, with just a hint of vinegar! The vinegar smell dissipated pretty quickly and when it did...tada!! No "Boy Bathroom" smell at all! I don't know if I'll do this once a week, but I will definitely do it once a month when I do the faucets!! Maybe more if things start to get stinky!
Finally, after removing the vinegar soaked paper towels on the faucets and giving a little scrub, I used the tip on how to clean a porcelain sink from The 36th Avenue. I read a bunch of the comments before I got started and saw one that said you could skip everything and just do the final, Clorox Clean Up step so of course I gave it a try...The results were okay but nothing as earth-shattering as I was hoping for, so I went back and followed the instructions step by step and all I can say is WOW!!!! We have a cheap pedestal sink in our Guest Bathroom that I've never been able to get really clean and an even cheaper fake marble counter/sink in the Master that always looked gross...that is until now!! All the black scuff marks and strange unidentifiable stains are a thing of the past and I am left with beautiful, gleaming white sinks that I don't hate anymore!! I am totally intrigued by the dishwasher crystals cleaning power. For my next trick I may try this combination of steps in our nasty fiberglass shower enclosures!! :) This is also something I'm going to start doing monthly!!
After cleaning my disgusting floors with my go-to favorite...my Bona Hardwood Floor Mop and Cleaning Solution, I gave Ask Anna's fake-out a try! And I have to say, I was surprised at how well it worked!! The majority of my floor issues are the result of sippy cup spills, so going around once a day with a hand towel really does the trick! This, coupled with my Roomba dependency may just help me look like I spend a ton of time keeping my floors clean!! If you have hardwood (or fake hardwood like we do) it's definitely worth a try!!
Now...on to the bathrooms! Eeeww! I honestly have no idea how two toddlers and a grown man can make such a mess just going potty...and it's a total toss up as to who is the worst offender! :) On the bright side, ALL of my tricks that I picked worked even better than I had imagined! I highly recommend them all!! And the best part is, they all utilize the same concepts and ingredients, so doing them all takes very little time compared to the amazing results!! I tried them in this order and was able to bang out two bathrooms in under an hour. Considering how gross they were at the start I think that's quite an accomplishment!! :)
I stated with Joyful Homemaking's tip for removing mineral deposits around faucets...I just wrapped the faucets in both bathrooms in paper towels soaked in vinegar and let them sit until I was done with just about everything else. After I took off the towels I gave a little scrub to any deposits that were left and viola!! My faucets look brand new and shiny!! It even took the caked on deposits on the faucets themselves. I'll definitely be doing this once a month!!
So now for the million dollar question - Will the tip for Efficiently clean a bathroom using 3 paper towels??? Change my life?? I'm not 100% sure yet but I think it just might! After my first try I can tell you I was able to "clean" two bathrooms, top to bottom in about 30 minutes. And they look as good as they did after the big cleaning I gave them the week before! The key is definitely the microfiber towels! If you see them at your local Costco I definitely recommend buying a bunch!! I have no idea why, by our house is extremely dusty and combine that with three dogs and let's just say stuff accumulates everywhere. These microfiber towels pick all the yuck up easily and quickly. Next I'm going to try dusting with them!!
Now let me just tel you about the pillowcase ceiling fan cleaning technique from Real Simple...why hadn't I heard about this before!! Our fans are all over our beds and cleaning them usually required stripping the beds and putting something down in case any yuck ended up falling off the fans...well no more my friends!! In about 2 minutes I cleaned all the fans in our house (ooh, were they gross!!) with all the yuck landing safely inside the pillowcase!!! Brilliant!!!
This next tip from One Good Thing...was the closest thing to a failure I experienced this week. And it really wasn't a failure at all. I made a paste of 1/4 cup baking soda with a splash of peroxide and put it on all the black, crusty stains I've been trying to remove from my stainless steel stove top since we moved in 7 years ago, and it removed about half of them completely. The others ended up getting smaller and less noticeable, so I'm hoping with repeated applications they will eventually go. Next, I'm going to try this on the black stains on the bottoms of my pots and pans!!
I'm actually pretty stoked that everything worked as well as they did!! Just another affirmation for my Pinterest addiction!! I'm so stoked that I do think the tip from Organizing Made Fun is going to change my life. I do hate cleaning, but for 15-20 minutes a day I think I can stomach it!! So my goal is to stick to her weekly schedule for the next month and see how it goes! Of course, I'll keep you posted! :)
Thursday, May 17, 2012
Week 18 & 19 Assignment - Results
Wow!!!! I still can't believe we pulled it off...keeping 40 (yes, four-zero) kids occupied and having fun for over three hours!! We pumped them full of sugar and then ran them ragged...I'm hoping their parents got to enjoy a quiet evening after they passed out!! :)
I guess I should start with the invitations...since B-Man wanted a Clone Wars theme, I searched eBay and found exactly what I wanted from a familiar name...Tink Designs. Hannah at Tink Designs helped me create the most adorable Dr. Seuss baby shower invites for my sister-in-law a while back so I was more than happy to do business with her again!
Thanks to a little help from the Biggest Kid I Know (a.k.a. Jedi Master Big "E"), he and Darth Vader (a.k.a. The Hubs) put on the best Jedi Training I've ever seen!! Well, yes it was the only one I have ever seen but I can't imagine finding one better...When Jedi Master Big "E" disappeared to his car and came back with an armful of obstacle course gear and wearing a Snuggie-inspired Jedi outfit, I knew this was going to be way cooler than I had ever imagined!!
After running through the obstacle course several times, burning off the Wookie Cookies and Yoda Soda, they were awarded their "lightsabers" and continued to hone their skills on eachother and evil Dark Side Bubbles. It was hysterical!! The best part was when Darth Vader arrived and got the bejeebers beat out of him by 40 kids ready to defeat the Dark Side!! Poor Hubs! :)
Speaking of Wookie Cookies and Yoda Soda, here's the spread for the day...
First, let me say that the Oreo Cookie Cupcake recipe is crazy easy and TO DIE FOR!!!! If you have a need for cupcakes, I HIGHLY recommend giving it a try! I had several people ask me which bakery I got them from, and when I told them I made them they didn't believe me!
The food labels were easy too, just find a font you like and some cardstock and let Word do the rest! I just found a label template that used the size I wanted and went to town. I would share the font I used with you...but in downloading several Star Wars fonts trying to decide which to use I downloaded a virus too...since I don't know which one it came from I figured I should keep my cooties to myself! :) I will share this awesome website I used to come up with a lot of the food names...www.StarWars.com has an Encyclopedia with all the character and location names from the movies as well as the Clone Wars cartoons. I also used it to find a picture for the water labels, which turned out to be much easier than I thought it would be! I started with Avery 6575 Permanent Durable I.D. Labels. These labels are pretty waterproof and super sticky so you don't end up with a huge mess once you put the bottles on ice. Definitely shop around...I found them at Staples for almost half the price on Avery's website. Then I made my own template in Word based on the size of the labels on a bottle of Kirkland (Costco) water, which I would love to share with you here but for some reason when I try to Google Doc it the format goes out the window...so if you want it send me a message and I'll e-mail it to you. Then it's just a matter of cutting the labels and putting them on the bottles...Definitely worth the time and effort in my book!
I know you all are wondering...did I make the Death Star Pinata??? Well, sort of...after sitting down and really reading the instructions my sanity momentarily returned long enough for my brain to scream..."JUST BUY A ROUND PINATA AND PAINT IT SILVER YOU IDIOT!!!!" So that's what I did! :) I bought a $15 baseball pinata and spray painted it silver. Then I added some black glitter grid lines and a circle where the planet demolishing beam comes out of. B-Man loved it but asked me, "Mommy, where is the green thing?" I had no idea what he was talking about but after a series of questions determined that he wanted a green beam coming out of it to blow things up with...too bad his Mommy isn't THAT crafty! :)
I guess I should start with the invitations...since B-Man wanted a Clone Wars theme, I searched eBay and found exactly what I wanted from a familiar name...Tink Designs. Hannah at Tink Designs helped me create the most adorable Dr. Seuss baby shower invites for my sister-in-law a while back so I was more than happy to do business with her again!
Thanks to a little help from the Biggest Kid I Know (a.k.a. Jedi Master Big "E"), he and Darth Vader (a.k.a. The Hubs) put on the best Jedi Training I've ever seen!! Well, yes it was the only one I have ever seen but I can't imagine finding one better...When Jedi Master Big "E" disappeared to his car and came back with an armful of obstacle course gear and wearing a Snuggie-inspired Jedi outfit, I knew this was going to be way cooler than I had ever imagined!!
Speaking of Wookie Cookies and Yoda Soda, here's the spread for the day...
First, let me say that the Oreo Cookie Cupcake recipe is crazy easy and TO DIE FOR!!!! If you have a need for cupcakes, I HIGHLY recommend giving it a try! I had several people ask me which bakery I got them from, and when I told them I made them they didn't believe me!
The food labels were easy too, just find a font you like and some cardstock and let Word do the rest! I just found a label template that used the size I wanted and went to town. I would share the font I used with you...but in downloading several Star Wars fonts trying to decide which to use I downloaded a virus too...since I don't know which one it came from I figured I should keep my cooties to myself! :) I will share this awesome website I used to come up with a lot of the food names...www.StarWars.com has an Encyclopedia with all the character and location names from the movies as well as the Clone Wars cartoons. I also used it to find a picture for the water labels, which turned out to be much easier than I thought it would be! I started with Avery 6575 Permanent Durable I.D. Labels. These labels are pretty waterproof and super sticky so you don't end up with a huge mess once you put the bottles on ice. Definitely shop around...I found them at Staples for almost half the price on Avery's website. Then I made my own template in Word based on the size of the labels on a bottle of Kirkland (Costco) water, which I would love to share with you here but for some reason when I try to Google Doc it the format goes out the window...so if you want it send me a message and I'll e-mail it to you. Then it's just a matter of cutting the labels and putting them on the bottles...Definitely worth the time and effort in my book!
I know you all are wondering...did I make the Death Star Pinata??? Well, sort of...after sitting down and really reading the instructions my sanity momentarily returned long enough for my brain to scream..."JUST BUY A ROUND PINATA AND PAINT IT SILVER YOU IDIOT!!!!" So that's what I did! :) I bought a $15 baseball pinata and spray painted it silver. Then I added some black glitter grid lines and a circle where the planet demolishing beam comes out of. B-Man loved it but asked me, "Mommy, where is the green thing?" I had no idea what he was talking about but after a series of questions determined that he wanted a green beam coming out of it to blow things up with...too bad his Mommy isn't THAT crafty! :)
To top off the day, each new Jedi received an Official Jedi Certificate and Wristband...
I found something similar, but not "Clone Wars" on a website but they didn't offer a "Clone Wars" version, so I asked Hannah at Tink Designs what she could come up with (how do I love eBay!!??) and she totally hit it out of the park!! The wristbands I found at www.BirthdayExpress.com and with an awesome Groupon I bought a while back I got them half price!! :)
All in all I think this was the most awesome party I will EVER pull off!! The kids all had an absolute blast! Some of the "Adults" too!
Now to start planning a Disney Princess Party!! :)
Thursday, May 3, 2012
Week 17 Assignment - Results
Well, it's official!! Potty training is kicking my butt!! I don't know when it happened, but my sweet, lovable, angel daughter has turned into the most stubborn person I know! Although we've had two successful potty poops in the last month, they were both a result of making her sit on the potty for AGES after she went a little in her pants. Other than that, she just refuses to do it! The funny thing is, after each successful one, she was so happy and proud saying that it wasn't so scary going in the potty...but unfortunately the euphoria doesn't last. :( I've tried everything from bribes to punishment to no avail. Couple this with the fact that nap times may be coming to and end in this household and the end result is my "me time" may be becoming a thing of the past.
So what did I accomplish this week??? Unfortunately not much. I did get the "artwork" done for the bathroom and after several attempts I finally figured out how to use the stencil. Funny how all I had to do was trust the people that made it and follow their directions to the letter! :) When they say you need to roll almost all of the paint off the roller onto a paper towel before using it on the stencil they actually mean it!! Once I stopped trying to fight the stencil, it worked like a charm!! What do you think...
I also spent the week making "Teacher Appreciation" projects which were a blast! I made three "Mercury Glass" dollar store vases for "flower day" where each student brought one flower for each teacher. The bouquets ended up being really adorable!! I also made these M&M gifts that I found at Domestically Speaking and boy are they cute!! :)...And check me out! Finally learning how to make a photo collage in Picasa!!
So I guess the crown molding will wait for another time. The good news is it doesn't look too bad even without being "finished"...or maybe that's the bad news. I think if it looked like crap I'd be more motivated to get it done. But since B-man's birthday is less than two weeks away it will have to wait!! It's time to get my Force on! Maybe I can use the Force to help potty train the Pooptress! :)
So what did I accomplish this week??? Unfortunately not much. I did get the "artwork" done for the bathroom and after several attempts I finally figured out how to use the stencil. Funny how all I had to do was trust the people that made it and follow their directions to the letter! :) When they say you need to roll almost all of the paint off the roller onto a paper towel before using it on the stencil they actually mean it!! Once I stopped trying to fight the stencil, it worked like a charm!! What do you think...
I also spent the week making "Teacher Appreciation" projects which were a blast! I made three "Mercury Glass" dollar store vases for "flower day" where each student brought one flower for each teacher. The bouquets ended up being really adorable!! I also made these M&M gifts that I found at Domestically Speaking and boy are they cute!! :)...And check me out! Finally learning how to make a photo collage in Picasa!!
So I guess the crown molding will wait for another time. The good news is it doesn't look too bad even without being "finished"...or maybe that's the bad news. I think if it looked like crap I'd be more motivated to get it done. But since B-man's birthday is less than two weeks away it will have to wait!! It's time to get my Force on! Maybe I can use the Force to help potty train the Pooptress! :)
Tuesday, April 24, 2012
Week 16 Assignment - Results
Wow, do I feel better!! I think I have completely erased all evidence of the party from our home, and thankfully I didn't find any more scary surprises along the way!! I also had a chance to do a little something fun! I took some dollar store finds I had purchased a while back and experimented with "Mercury Glass". Not only was it fun...it was SUPER EASY!! The hardest part was finding the Krylon Looking Glass paint which apparently is sold out everywhere in Southern Orange County! Thankfully, I found a bottle (from what I can tell the absolute last one in the area) and got to painting. I first tried Katies Rose Cottage technique of spraying the Looking Glass on followed by spraying with a half vinegar half water solution. It looked great in the areas where the Looking Glass hadn't already dried (man, this stuff dried FAST!!) but I had quite a few areas that didn't work because it was dry before I could get it sprayed. I found a couple other tutorials that suggest spraying with the vinegar solution first and then the Looking Glass so I tried that and it worked much better. I ended up doing a little of both, spraying the vinegar solution first, then the Looking Glass, and then a little more vinegar solution and viola!! It worked like a charm! I also tried doing both the inside and outside of the glass as well as just the inside and found I really like the result when I did both best. So I have ordered some more Looking Glass online (found it on Amazon for less than I paid for the bottle at Michaels with free shipping). I guess I went a little crazy because here's what I ended up with...
Recognize the last picture?? Well, I got tired of paper cherry blossoms falling into my sink so I gave up on the ones I had made and found these light up blossom branches at Bed Bath and Beyond. I know...they are a bit tacky, but they make me smile so what the hell! :) I originally was going to try and cut the bottoms off my frapuccino bottles because they have wires connecting the branches, but after seeing a bunch of tutorials on Pinterest I decided there had to be an easier way and there was! I found these cylindrical hurricane shades at Modern Vase and Gift and I was sold! Their shipping is a little high but they are located in Southern California and they let you pick up your order for free if you are willing to make the trek to the City of Industry. I figured I'd spend that much in gas getting there and opted to have them shipped...plus, I'm lazy!
All in all, I've had a great week...just wish potty training was as easy as making Mercury Glass!! I'm afraid if something doesn't give my beautiful blue eyed daughter will become my brown eyed girl! But I'm hopeful...yesterday I bought two Disney Princess dresses and one Minnie Mouse dress and hung them from the shower curtain rod in the bathroom. I told Brenna that every time she poops in the potty she gets to pick a dress, but if she goes in her pants I have to take one back. She's still resisting but she REALLY wants to dresses so I'm hoping she'll come around. Nothing like bribery to raise your kid right...right???
Recognize the last picture?? Well, I got tired of paper cherry blossoms falling into my sink so I gave up on the ones I had made and found these light up blossom branches at Bed Bath and Beyond. I know...they are a bit tacky, but they make me smile so what the hell! :) I originally was going to try and cut the bottoms off my frapuccino bottles because they have wires connecting the branches, but after seeing a bunch of tutorials on Pinterest I decided there had to be an easier way and there was! I found these cylindrical hurricane shades at Modern Vase and Gift and I was sold! Their shipping is a little high but they are located in Southern California and they let you pick up your order for free if you are willing to make the trek to the City of Industry. I figured I'd spend that much in gas getting there and opted to have them shipped...plus, I'm lazy!
All in all, I've had a great week...just wish potty training was as easy as making Mercury Glass!! I'm afraid if something doesn't give my beautiful blue eyed daughter will become my brown eyed girl! But I'm hopeful...yesterday I bought two Disney Princess dresses and one Minnie Mouse dress and hung them from the shower curtain rod in the bathroom. I told Brenna that every time she poops in the potty she gets to pick a dress, but if she goes in her pants I have to take one back. She's still resisting but she REALLY wants to dresses so I'm hoping she'll come around. Nothing like bribery to raise your kid right...right???
Tuesday, April 17, 2012
Week 14 & 15 Assignment - Results
I know...I've done it again! :( I let a one week project get the better of me and it took two...but not exactly for the reasons you might think. For one thing, we've been trying to potty-train my almost 3-year old daughter and let me just say we've been less than successful! I've always heard girls were easier to potty train than boys...guess the people who told me that haven't met my daughter! :( She caught on to going #1 in the potty no problem, but two weeks in and she flat out refuses to go #2 anywhere but in her pants. :( We've tried every kind of bribery (stickers, candy, toys, and even trips to the zoo) and finally resorted to taking away all her "Princess Dresses" until she does it because "Princesses don't go poo poo in their pants!" Any suggestions, friends?? In my spare time...the "crown molding" went up in one day and really wasn't as difficult as I thought it would be, but I never got around to painting it because I had another, much more time-sensitive mission on my plate - the Hubs' Surprise 40th Birthday Party!!! For obvious reasons I didn't let you in on the secret until after we pulled off the coup of all coups, but I'm ready to share with you all the ups and downs of what went into planning my second most elaborate party to date (the first was my wedding!).
This all started 10 years ago at his 30th Birthday Party. I threw him a surprise "Roast" and couldn't believe how many of his friends couldn't wait to embarrass him publicly!! People created Power Point presentations, prepared detailed speeches, brought props (the blow up doll was my favorite!) and turned my little idea into an absolute blast. So it seemed fitting to revisit the "Roast" for his 40th!! I saw a pin on Pinterest with a party that had a Beer and Bacon theme and knew I had my muse! It all started with the invitations, that I created through Heritage Makers.
-F.jpg)
-B.jpg)
In fact...I think I can say there are three reasons this party turned out as fabulous as it did...#1 - Heritage Makers, #2 - Pinterest, and #3 - The Queen of Party Planning, my good friend Amber!! Not only did I make the invitations through Heritage Makers, I also made the cupcake toppers...
The food labels...
And the tags for the favors...
I won't bore you with the details...but if you want to learn more about how I made them just let me know! :)
Now onto my #2 reason for my party success...Pinterest!! Once I found my theme, Pinterest was an amazing resource for party ideas, recipes, and just plain old party tricks! I did searches on "beer", "bacon", and "beer and bacon" and came up with a ton of ideas. Couple that with pins Amber (my #3 reason for my success who should really be promoted to #1 now that I think about it) sent me and I was on a roll. I will say I learned a VERY valuable lesson, if you are planning a surprise party for someone you live with...you may want to rethink using "bacon" as your primary food ingredient!! It is almost impossible to cook bacon without them coming home and asking "What's that smell???" :) Luckily, with the help of some friends and family who prepared some of the main dishes for me, we were able to pull off quite a spread! Here's the menu (everything contained either beer and/or bacon) we used in case you are tempted to give it a try...
Bacon Popcorn - It's a good thing I didn't read HOW you make this until after I ordered the food labels or I probably never would have tried it. It's basically popping corn in bacon grease...eewwww. But it turned out to be a huge hit and was actually pretty yummy! And SUPER easy to boot! I was a bit grossed out at the comments that suggested pouring melted bacon grease over the popped corn like you would butter...definitely didn't do that!! I thought it was fine on it's own. :)
Beer Dip and Pretzels - We added the 1 cup of shredded cheddar and doubled the hot sauce as some of the reviews recommended and it was FABULOUS!! This was one of the dishes I farmed out...Big thanks to my sister-in-law for making 5 batches!! :)
Bacon Wrapped Cheesy Crackers - I can't tell you how many compliments I got on these! Super easy to make and really yummy! Just take note that they have to bake for 2 HOURS!!
Bacon Wrapped Brats - These disappeared so fast, I only got one...but man was it tasty!!
Beer Mac & Cheese - Soooooo good!! I think this is going to become my new go-to Mac & Cheese recipe...sorry Kerri's Grandma (the creator of my current go-to recipe)!! Thanks to my mother-in-law for whipping up two batches of cheesy goodness!!
Bacon Potato Salad - I had so many people ask me for this recipe!! They said it was the best potato salad they'd ever had...must have been because it was gone by the time I got to it! :( Super thanks to the Queen of Party Planning for whipping up a double batch of this one!! I think I'm bringing it to my niece's birthday party later this month!!
Spicy Beer Beans - This was by far the easiest recipe on my menu...but everyone loved it. I did have a couple of people say..."all it needs is some bacon bits"...which in hindsight would have probably made them even BETTER!! This may be a summer cookout staple around here. Especially since they can be served hot or cold. And did I mention how easy they were?????
Beer Lollipops - Yes, you read correctly...BEER LOLLIPOPS!! Everyone looked at me like I was insane - especially the guy down at our local home brew store where I bought the hops. But I have to say they turned out great!! Once again, the Queen of Party Planning came to the rescue and let me make her beautiful home smell like a brewery! And when we didn't finish, she made the rest for me later in the week. What a lifesaver!!! There is NO WAY I would have been able to make these at home without the Hubs wondering what the #$*@ I was up to! We used a really hoppy IPA (Stone Ruination) and "Amarillo" hop pellets. Kind of a pain but definitely worth the effort! If you want to give them a go, click on the website in the pin description...it was the only way I could pin it.
S'mores Bar with Beer Marshmallows - Since I finally had a permanent spot for the fire pit, it seemed like a perfect excuse for s'mores...but I wanted to stick with the Beer or Bacon theme. Kudos to Amber for stumbling across this one on Pinterest!! I just used the portion of the recipe to make the beer marshmallows and all I can say is WOW!! They were amazing!! I used my favorite beer, Blue Moon, and have to say they are probably the second yummiest thing I've ever made...#1 is coming up!! To keep them from sticking together I just tossed them in a bag of powdered sugar after I cut them into squares and gave them a good coating. And they were easy to make...definitely worth a try for your next campfire excursion!! (Yes, I will be bringing a batch to Sequoia friends in case you missed them this go round!)
Guinness Jameson Baileys Cupcakes - Yep! Why have only one alcohol in your cupcakes when you can have three??? That's just how I roll! :) These are by far the most delicious food I have ever made in my entire life!! And don't let the terms "from scratch" or "ganache" intimidate you. These cupcakes, although amazing, are remarkably easy!! One little trick I found on Pinterest absolutely saved my life...if you haven't tried the saran wrap trick for filling frosting bags, DO IT!!! I have always hated frosting cupcakes because I end up wasting a bunch of frosting and making a huge mess. This is soooo the way to do it! I did it for both the ganache and the frosting and filled and frosted 72 cupcakes in under an hour. That's a land-speed record for me!
Speaking of booze...in addition to a heathly selection of beer, I got a bee up my butt to make Bacon Habanero Infused Vodka! (Thanks Zane Lamprey of "Drinking Made Easy" for introducing me to this little wonder!) While the process was a little disturbing, the end result was phenomenal! I found a recipe on Pinterest (of course!) for Bacon Infused Vodka and just added Habanero flakes when I put in the bacon. I used a neat trick I got from Amber on how to cook bacon in the oven...way easier and less messy than on the stove! I don't think I'll ever cook bacon on the stove again! I used the Bacon Habanero Infused Vodka to make...
The Bloody Pig - Basically a Bloody Mary with Bacon Vodka, but the Bloody Mary Mix in this recipe is the bomb!! I give it four hooves up!! And once again, super easy to make but super impressive! There's no shame in letting people think I worked harder than I really did, right??
The Dirty Pig - Basically a Dirty Martini with Bacon Vodka (the website I took it from called it the Pickled Pig...but I liked the name Dirty Pig better!). I'm definitely not a Dirty Martini kind of girl, but I have to say this turned me around. I don't know that I could drink a bunch of these, but I really enjoyed the one...okay two...that I had! :)
I have to apologize now for the total lack of pictures of all these goodies...but I have to admit I had so much fun I totally forgot to take pictures once everything was set up. In fact, I think I took less than a dozen pictures the whole evening. Oops!! But I guess the moral of the story is 10 packages of bacon + lots of booze + good food + tons of help + really good friends = an amazing evening!! I really am not exaggerating when I say tons of help!! When the first guests arrived I was no where near ready, but they swooped in and helped me look much more on top of things than I really was in no time at all! I really REALLY couldn't have done it without you guys!!
Oh yeah...the "crown molding"! Well, the long and the short of it is Tracy and I got it installed in about 3 hours and it was pretty easy going up. Is it easier than "real" crown molding? Definitely in the cutting, but the downside is you have way more seams to deal with, and it's pretty delicate. I have a few finger dents from pushing it into place that I wasn't anticipating. For a small room I don't think it's a bad option, but I definitely won't be doing this in my "great room"...I'd have a hundred seams. Since I haven't finished caulking and painting it, I have no idea if the seams are going to be a pain or not...but I'll definitely let you know! :) In the meantime, here's what it looks like so far...
What do you think????
This all started 10 years ago at his 30th Birthday Party. I threw him a surprise "Roast" and couldn't believe how many of his friends couldn't wait to embarrass him publicly!! People created Power Point presentations, prepared detailed speeches, brought props (the blow up doll was my favorite!) and turned my little idea into an absolute blast. So it seemed fitting to revisit the "Roast" for his 40th!! I saw a pin on Pinterest with a party that had a Beer and Bacon theme and knew I had my muse! It all started with the invitations, that I created through Heritage Makers.
-F.jpg)
-B.jpg)
In fact...I think I can say there are three reasons this party turned out as fabulous as it did...#1 - Heritage Makers, #2 - Pinterest, and #3 - The Queen of Party Planning, my good friend Amber!! Not only did I make the invitations through Heritage Makers, I also made the cupcake toppers...
The food labels...
And the tags for the favors...
I won't bore you with the details...but if you want to learn more about how I made them just let me know! :)
Now onto my #2 reason for my party success...Pinterest!! Once I found my theme, Pinterest was an amazing resource for party ideas, recipes, and just plain old party tricks! I did searches on "beer", "bacon", and "beer and bacon" and came up with a ton of ideas. Couple that with pins Amber (my #3 reason for my success who should really be promoted to #1 now that I think about it) sent me and I was on a roll. I will say I learned a VERY valuable lesson, if you are planning a surprise party for someone you live with...you may want to rethink using "bacon" as your primary food ingredient!! It is almost impossible to cook bacon without them coming home and asking "What's that smell???" :) Luckily, with the help of some friends and family who prepared some of the main dishes for me, we were able to pull off quite a spread! Here's the menu (everything contained either beer and/or bacon) we used in case you are tempted to give it a try...
Bacon Popcorn - It's a good thing I didn't read HOW you make this until after I ordered the food labels or I probably never would have tried it. It's basically popping corn in bacon grease...eewwww. But it turned out to be a huge hit and was actually pretty yummy! And SUPER easy to boot! I was a bit grossed out at the comments that suggested pouring melted bacon grease over the popped corn like you would butter...definitely didn't do that!! I thought it was fine on it's own. :)
Beer Dip and Pretzels - We added the 1 cup of shredded cheddar and doubled the hot sauce as some of the reviews recommended and it was FABULOUS!! This was one of the dishes I farmed out...Big thanks to my sister-in-law for making 5 batches!! :)
Bacon Wrapped Cheesy Crackers - I can't tell you how many compliments I got on these! Super easy to make and really yummy! Just take note that they have to bake for 2 HOURS!!
Bacon Wrapped Brats - These disappeared so fast, I only got one...but man was it tasty!!
Beer Mac & Cheese - Soooooo good!! I think this is going to become my new go-to Mac & Cheese recipe...sorry Kerri's Grandma (the creator of my current go-to recipe)!! Thanks to my mother-in-law for whipping up two batches of cheesy goodness!!
Bacon Potato Salad - I had so many people ask me for this recipe!! They said it was the best potato salad they'd ever had...must have been because it was gone by the time I got to it! :( Super thanks to the Queen of Party Planning for whipping up a double batch of this one!! I think I'm bringing it to my niece's birthday party later this month!!
Spicy Beer Beans - This was by far the easiest recipe on my menu...but everyone loved it. I did have a couple of people say..."all it needs is some bacon bits"...which in hindsight would have probably made them even BETTER!! This may be a summer cookout staple around here. Especially since they can be served hot or cold. And did I mention how easy they were?????
Beer Lollipops - Yes, you read correctly...BEER LOLLIPOPS!! Everyone looked at me like I was insane - especially the guy down at our local home brew store where I bought the hops. But I have to say they turned out great!! Once again, the Queen of Party Planning came to the rescue and let me make her beautiful home smell like a brewery! And when we didn't finish, she made the rest for me later in the week. What a lifesaver!!! There is NO WAY I would have been able to make these at home without the Hubs wondering what the #$*@ I was up to! We used a really hoppy IPA (Stone Ruination) and "Amarillo" hop pellets. Kind of a pain but definitely worth the effort! If you want to give them a go, click on the website in the pin description...it was the only way I could pin it.
S'mores Bar with Beer Marshmallows - Since I finally had a permanent spot for the fire pit, it seemed like a perfect excuse for s'mores...but I wanted to stick with the Beer or Bacon theme. Kudos to Amber for stumbling across this one on Pinterest!! I just used the portion of the recipe to make the beer marshmallows and all I can say is WOW!! They were amazing!! I used my favorite beer, Blue Moon, and have to say they are probably the second yummiest thing I've ever made...#1 is coming up!! To keep them from sticking together I just tossed them in a bag of powdered sugar after I cut them into squares and gave them a good coating. And they were easy to make...definitely worth a try for your next campfire excursion!! (Yes, I will be bringing a batch to Sequoia friends in case you missed them this go round!)
Guinness Jameson Baileys Cupcakes - Yep! Why have only one alcohol in your cupcakes when you can have three??? That's just how I roll! :) These are by far the most delicious food I have ever made in my entire life!! And don't let the terms "from scratch" or "ganache" intimidate you. These cupcakes, although amazing, are remarkably easy!! One little trick I found on Pinterest absolutely saved my life...if you haven't tried the saran wrap trick for filling frosting bags, DO IT!!! I have always hated frosting cupcakes because I end up wasting a bunch of frosting and making a huge mess. This is soooo the way to do it! I did it for both the ganache and the frosting and filled and frosted 72 cupcakes in under an hour. That's a land-speed record for me!
Speaking of booze...in addition to a heathly selection of beer, I got a bee up my butt to make Bacon Habanero Infused Vodka! (Thanks Zane Lamprey of "Drinking Made Easy" for introducing me to this little wonder!) While the process was a little disturbing, the end result was phenomenal! I found a recipe on Pinterest (of course!) for Bacon Infused Vodka and just added Habanero flakes when I put in the bacon. I used a neat trick I got from Amber on how to cook bacon in the oven...way easier and less messy than on the stove! I don't think I'll ever cook bacon on the stove again! I used the Bacon Habanero Infused Vodka to make...
The Bloody Pig - Basically a Bloody Mary with Bacon Vodka, but the Bloody Mary Mix in this recipe is the bomb!! I give it four hooves up!! And once again, super easy to make but super impressive! There's no shame in letting people think I worked harder than I really did, right??
The Dirty Pig - Basically a Dirty Martini with Bacon Vodka (the website I took it from called it the Pickled Pig...but I liked the name Dirty Pig better!). I'm definitely not a Dirty Martini kind of girl, but I have to say this turned me around. I don't know that I could drink a bunch of these, but I really enjoyed the one...okay two...that I had! :)
I have to apologize now for the total lack of pictures of all these goodies...but I have to admit I had so much fun I totally forgot to take pictures once everything was set up. In fact, I think I took less than a dozen pictures the whole evening. Oops!! But I guess the moral of the story is 10 packages of bacon + lots of booze + good food + tons of help + really good friends = an amazing evening!! I really am not exaggerating when I say tons of help!! When the first guests arrived I was no where near ready, but they swooped in and helped me look much more on top of things than I really was in no time at all! I really REALLY couldn't have done it without you guys!!
Oh yeah...the "crown molding"! Well, the long and the short of it is Tracy and I got it installed in about 3 hours and it was pretty easy going up. Is it easier than "real" crown molding? Definitely in the cutting, but the downside is you have way more seams to deal with, and it's pretty delicate. I have a few finger dents from pushing it into place that I wasn't anticipating. For a small room I don't think it's a bad option, but I definitely won't be doing this in my "great room"...I'd have a hundred seams. Since I haven't finished caulking and painting it, I have no idea if the seams are going to be a pain or not...but I'll definitely let you know! :) In the meantime, here's what it looks like so far...
What do you think????
Wednesday, April 4, 2012
Week 13 Assignment - Results
Let me tell you...this week's assignment has taken my new-found feeling of invincibility to a whole new level!! Not only did I take what I saw in my head and make it happen...I did it all by myself!! Power tools and all!! And I have to say once I got over my fear of screwing it up, it was really quite easy!! So here is the end result (please excuse the pictures...and the disgusting shower doors...does anyone have a pin for getting hard water stains off glass doors that are CLR proof???)
Here are a few things I learned along the way...just in case you want to give it a try!
- Apparently my house was built by stoners!! Not a single wall in my bathroom is plumb. In fact, I don't think any of the walls in the house are! If you have the same issue, I highly recommend using trim made of MDF...it's much easier to sand the backs of to match the random angles of your walls.
- I installed the trim pieces using adhesive caulking and then secured them with finishing nails. Make sure you pre-drill the holes for the finishing nails before attaching the piece to the wall.
- I caulked the edges before painting the trim...and instead of masking everything off with tape I bought a small, angled paintbrush at the craft store and used that on all my edges. I have a new found fear of masking tape and this turned out to be easier and gave me perfect lines!! Thanks, Tracy for this tip!!!
Tuesday, March 27, 2012
Week 12 Assignment - Results
What a week!!! I'm sore from head to toe but I feel like a million bucks! The sanding and staining took forever...but thankfully I had Tracy to help. It's a tedious task, so if you can have a friend along for the ride it definitely makes it more tolerable!! :) Man, do I owe Tracy!!!!
Here are some additional things you may want to keep in mind if you want to give it a try...
- Safety glasses and masks are a definite MUST while you are sanding. You never know where your pallets have been and the last thing you want is getting their secrets in your lungs and eyes!! :)
- If you aren't super limber, you may want to consider sanding before you but your daybed and/or table together...that goes for staining too.
- Speaking of staining, if you use the Behr Waterproofing Stain I should warn you...it's super runny and drippy!! If you can, I highly suggest staining over a surface like grass or dirt that won't be ruined by any stain that drips down.
- And don't use your "favorite" paint brush...whatever brush you use will be ruined by the time you're done...not by the stain but by the pallets.
So...want a peek at the (almost) finished product??
Once the sanding and staining were complete, it was time to assemble the outdoor dining room. I found my globe lights at Party City for $14.99/each...they were the only ones I could find with white cords instead of green. I ended up using 5 strands. My HD boyfriend suggested attaching eye hooks to the fence and house and using zip ties to attach the light strands to them. It's a perfect solution because it's easy to do, and if I ever need to change the strands out all I need are a few new zip ties!
I love how the space turned out! We ended up taking the center extensions out of the table because it was just too big for the four of us...which gave us a bunch of extra room for a fire pit at the far side of the space. I've been dying to find a safe place to have our fire pit but don't like the idea of having it in the middle of everything with two small kids, and I finally found it!!
The only thing I didn't get done is scrubbing the heck out of the tables and chairs...I ran out of sunny days. But I plan on tackling that in the next couple weeks in my "spare time". Definitely before summer!! That and a little decorating (I have some ideas for the wall of the house and Tracy wants to turn the pallet remnants we have into wall planters on the fence) and we'll be set for summer!!
The one positive thing that came with the rainy days is it gave me time to make my bolsters for the daybed. I just have to say BOLSTERS ARE THE COOLEST THINGS EVER!!! They are super easy and look much harder than they actually are! I did have to do some re-engineering since my bolster inserts were 30" and the pattern I found was for shorter inserts, but once you start sewing it's pretty easy to visualize what you want the final result to be and make the necessary adjustments. After making the first one I was so jazzed I decided I should try and make my very first tutorial to show you how easy they are to make...but unfortunately I was distracted by a non-napping 4-year old and cut the fabric wrong for the second bolster. I was able to do some more re-engineering and the second one turned out just fine, but I thought I shouldn't base my first ever tutorial on an OOPS!! Guess I'll just have to make another for my bed when I do my Master Bedroom Makeover and show you then.
So here is the finished daybed...bolsters and all!!
The only "downside" to this project is it has made me feel invincible!! I find myself pinning all these projects on Pinterest that involve major construction with little to no hesitation!! I now have a bee up by butt to build a whole storage/bench unit for our entryway thanks to Ana White...but unfortunately it will have to wait a bit. First I have to head back to the bathroom...
See you next week!!
Monday, March 19, 2012
Week 11 Assignment - Results
What can I say...I MUST have done something to piss Mother Nature off big time! I live in Southern California, land of sunshine and perfect weather. Two weeks ago it was 80 degrees, but this weekend nothing but rain! It wouldn't have been a big deal except I couldn't start this week's project until the Hubs went out of town on Friday. What was this week's project, you ask? Guess that would help to let you in on the surprise, eh? :)
So the Hubs' birthday is coming up, and he's been dying to have a space outside to smoke cigars and watch TV (since I won't let him smoke inside) and for his birthday I'm giving it to him! I started by pulling in some favors from a friend who owns a landscape company and had crushed granite installed in our side yard which used to be home to all our crap we didn't want to throw away. It was a total waste of space that will become the new home of our outdoor table and chairs once the rain stops and the stabilizer cures. I have big plans to make it a beautiful outdoor dining room and I can't wait to show it to you. Just have to wait for Mother Nature to cut me some slack! :) Hopefully next week...
Where the table and chairs used to be is going to be the Hubs' new outdoor lounge...complete with a DIY daybed and coffee table made out of pallets. I saw these posted on Pinterest a while back and knew they would be perfect. I just didn't think I could pull it off. But thankfully, I have Tracy (a.k.a. Bob Vila with Boobs) and together we took on the Pallet Daybed I found on Prudent Baby and the Pallet Coffee Table I found on Joy Ever After!!
Originally, we thought we had all weekend (Thursday night through Sunday night) to get this done...but like I said, Mother Nature hates me! Instead, we had to do it all Friday since Saturday and Sunday had a deluge of rain in the forecast! Somehow, we were able to complete the construction but unfortunately the cosmetic stuff will have to wait until next week when things dry out around here. I will say that I am just giddy with how they turned out!! I don't think I have ever been prouder of anything I've made!! Except my kids of course! :) And it wasn't nearly as hard as I was expecting it to be! But I know Tracy is a huge part of the reason I didn't give up halfway through crying!! I did learn a few valuable things along the way so in case you want to give them a try I'll share what I learned.
Daybed:
So the Hubs' birthday is coming up, and he's been dying to have a space outside to smoke cigars and watch TV (since I won't let him smoke inside) and for his birthday I'm giving it to him! I started by pulling in some favors from a friend who owns a landscape company and had crushed granite installed in our side yard which used to be home to all our crap we didn't want to throw away. It was a total waste of space that will become the new home of our outdoor table and chairs once the rain stops and the stabilizer cures. I have big plans to make it a beautiful outdoor dining room and I can't wait to show it to you. Just have to wait for Mother Nature to cut me some slack! :) Hopefully next week...
Where the table and chairs used to be is going to be the Hubs' new outdoor lounge...complete with a DIY daybed and coffee table made out of pallets. I saw these posted on Pinterest a while back and knew they would be perfect. I just didn't think I could pull it off. But thankfully, I have Tracy (a.k.a. Bob Vila with Boobs) and together we took on the Pallet Daybed I found on Prudent Baby and the Pallet Coffee Table I found on Joy Ever After!!
Originally, we thought we had all weekend (Thursday night through Sunday night) to get this done...but like I said, Mother Nature hates me! Instead, we had to do it all Friday since Saturday and Sunday had a deluge of rain in the forecast! Somehow, we were able to complete the construction but unfortunately the cosmetic stuff will have to wait until next week when things dry out around here. I will say that I am just giddy with how they turned out!! I don't think I have ever been prouder of anything I've made!! Except my kids of course! :) And it wasn't nearly as hard as I was expecting it to be! But I know Tracy is a huge part of the reason I didn't give up halfway through crying!! I did learn a few valuable things along the way so in case you want to give them a try I'll share what I learned.
Daybed:
- In Prudent Baby's tutorial, she used two swivel and three fixed casters. This thing is crazy heavy and we couldn't see how you would be able to move the bed easily front to back and side to side so we opted for five locking swivel casters.
- She didn't have a back on her daybed, but I didn't have a wall to put the daybed against. We ended up cutting about 12" off two pallets and used them as a back. We bolted the two together and then attached them with about a dozen L brackets (six on the front and six on the back...pretty much anywhere a 2 x 4 on the back lined up with a 2 x 4 on the base). I may also go back and install a few metal straps from the base to the back inside the pallets on the back anywhere the 2 x 4's are flush. It's pretty sturdy now and it's probably unnecessary, but knowing that big, clumsy men are going to be using this I figure better safe than sorry! :)
- When picking the pallets for the bottom of your daybed, try and choose two pallets where the 1 x 4's on the top line up. I didn't think to do that and as a result my arm rests aren't even...one is closer to the front than the other.
- She bolted her casters on, but we were afraid the wood on the bottom of the pallets wouldn't be strong enough, so we attached mine into the 2 x 4 frames with wood screws instead. Make sure you pick really beefy casters, especially if you expect multiple 200+ pound men to be sitting on it! :) If you do go with the wood screws you may want to pick up a few rubber screw protectors to cover any screws that don't line up with the 2 x 4 frames and end up being exposed. We cut the exposed screws with a Dremmel but they were still pretty sharp, so the screw protectors should keep the little ones from getting scratched. Hopefully!!
- She said she used 3/4" bolts in 2" and 3" lengths, but when I saw how big they were I thought that must have been a typo. I ended up using 3/8" bolts instead. I didn't use any 2" bolts because I attached my casters with wood screws, and I ended up needing several bolts that were longer than 3" due to the construction of my pallets. You may want to pick up 3 or 4-5" bolts just in case.
- For the bottom cushion I found a really gross, cheap twin mattress on CraigsList and hermetically sealed it in a $10 zipper vinyl mattress cover I found at Bed Bath and Beyond. It's waterproof, but rips pretty easily, so I put a tarp under the mattress to keep the pallets from snagging the bottom of it. I also had an old felt backed vinyl tablecloth that I wrapped the top with so the dogs (we have three) wouldn't rip the top. I'm going to cover it with a fitted sheet but of course I couldn't find one in the right green in any of the local stores. I did find one online but it won't be here until Wednesday. :(
- For the cushions on the back, I found these great "outdoor floor cushions" at Costco. Man, I LOVE Costco! They were less than $20/each and they are gorgeous!! I'm also going to make two bolsters for the sides...
Coffee Table:
- We used Gorilla Glue to attach the 4 x 4 posts to the pallets prior to installing the L brackets just to give it a little more sturdiness. Make sure you have HUGE clamps to hold things in place until the glue dries!
- We used much smaller locking swivel casters on the coffee table than we did on the daybed and attached them with wood screws into the 2 x 4 frames instead of bolting them.
- 4 x 4's are pretty expensive so you may want to check the remnant area at your home improvement store. I highly recommend getting yourself a Depot Boyfriend. Mine, Anthony, cut my 4 x 4 remnant into 4 6" pieces because I didn't have a saw big enough to cut it at home. He also led me around the store helping me get everything on my list (helping me save money along the way) so I didn't have to go searching. You know you spend too much time at the Depot when you go back to get one thing you forgot two days later and your Depot Boyfriend comes up to you to ask how the daybed is going!! :)
Well...are you as impressed with us as I am??? :)
Tuesday, March 13, 2012
Week 8 (and 9...and 10...) Assignment - Results
What can I say...I'm a bad blogger! :( My Week 8 Assignment got the better of me and became my Week 9 and 10 Assignment as well. In my defense I have one valid and credible excuse...SPRAY PAINT!!! If nothing else I learned one very valuable lesson from this assignment...I HATE SPRAY PAINT!!! As far as I can tell there is not one single benefit to using spray paint:
1) Ease of use? HA!!! Between having to wait for "perfect painting weather" days, all the prep work to protect everything you don't want paint on, and just the overall inconvenience of having to paint outside I would have to say this is not the case...at least for me. Using spray paint turned a two, maybe three day project into a two week one.
2) Smoother finish?? NOT!!! Between the drip marks, the splatter that comes at the beginning and end of the can, and the junk that accumulated on the cabinet while it was drying outside I definitely don't have anything I would consider smoother than if I had used a roller.
3) Fewer coats??? I DON"T THINK SO!!! I ended up using three cans of spray primer and almost four cans of paint for this tiny little cabinet. After three coats of primer (two coats, sanding, and a top coat) and three coats of paint with the same process, I am a little baffled by the claim on the can that the spray paint covers 2 x better. Better than what? Crayons???
4) Better Adhesion???? ONE WOULD HOPE BUT UNFORTUNATELY - NO!!! Even after all the prep work and coats, with proper drying times in between, areas of paint on the inside of the cabinet peeled off in chunks when I took the tape off that I used when painting the back wall of the cabinet. I'm not exaggerating when I say I cried! I almost scrapped the whole project and swore off painting laminate for good...but once my blood pressure came back down to normal I decided to head to the Depot to buy a sample of flat paint to match the Dark Walnut spray paint, grabbed a paint brush, and went to work.
All that said, the cabinet and the mirror are finally done. Yea!!!! Although I wasn't able to find a wallpaper that I liked, thanks to Pinterest I found something I liked even better. It would give me the pop of color I was looking for, and I would be able to match the green in my towels perfectly. It also gave me a fabulous finish for the glass in the door...thanks to Stacey's idea of replacing the glass. What is this fabulous find you ask? Cutting Edge Stencils!!!!
I chose the Casablanca Craft Stencil and tried using it on the back of the cabinet with a Behr Ultra Flat Sample in "Wasabi Powder." Unfortunately, the size of the stencil wasn't conducive to working in an enclosed area like inside a small cabinet and I just couldn't get the stencil to lay flat...even with spray adhesive. So I ended up painting the inside a solid green. But don't be surprised if you see me buying a sheet of plywood, stenciling the flat piece with Dark Walnut and Wasabi Powder, and replacing the current backing on the cabinet in the near future! :) I did use the stencil to etch the new glass I bought using a tutorial I found on Make It and Love It. The stencil definitely works better on flat, open surfaces!! And I would definitely recommend a lighter base color with a darker stencil color. With the dark brown base it was hard to get good coverage with the green. You have to use very light coats to prevent bleeding and I couldn't get good coverage. On their website they recommend using Benjamin Moore "Aura" paints because it has great coverage...may try that next time too!
To top it off I found the exact door pull I wanted at MyKnobs.com.
So even though it took longer than I expected, I am thrilled with how the cabinet turned out!! Take a look and let me know what you think...
The mirror was much easier than the cabinet, thank goodness!! I ended up priming it and painting it with the same spray paint I used on the cabinet. Then I went over it with my Mercury Glaze from Martha Stewart. I'm still not 100% sure I'm digging how it turned out. I'm thinking I might do one more coat of the glaze to lighten it up a little bit, but I decided I should wait a little bit to see if it grows on me. I don't hate it...I just don't know that I LOVE it!! Do you???
With all this complaining, I almost forgot...The Crates!! I did two like in the Master Bath but I'm thinking I need one more. The toilet in this bathroom is shorter and farther from the wall so I'm thinking a third one will be good...especially since storage is such an issue in this bathroom. In my "spare time" (a.k.a. someday...) I plan on making some fabric boxes to fit in the top and bottom crates (two each) so I can use them to store less attractive goodies (i.e. Make Up and other primping supplies). I ended up staining them with the Espresso Stain but decided not to do the Mercury Glaze. I liked how the darker stain went with the dark cabinet. Plus, since this bathroom is not nearly as "Bling!" as the Master, I thought the glaze might just be overkill. Do you agree?
Wow! This assignment really kicked my butt!! Maybe I should take it easy next week???
1) Ease of use? HA!!! Between having to wait for "perfect painting weather" days, all the prep work to protect everything you don't want paint on, and just the overall inconvenience of having to paint outside I would have to say this is not the case...at least for me. Using spray paint turned a two, maybe three day project into a two week one.
2) Smoother finish?? NOT!!! Between the drip marks, the splatter that comes at the beginning and end of the can, and the junk that accumulated on the cabinet while it was drying outside I definitely don't have anything I would consider smoother than if I had used a roller.
3) Fewer coats??? I DON"T THINK SO!!! I ended up using three cans of spray primer and almost four cans of paint for this tiny little cabinet. After three coats of primer (two coats, sanding, and a top coat) and three coats of paint with the same process, I am a little baffled by the claim on the can that the spray paint covers 2 x better. Better than what? Crayons???
4) Better Adhesion???? ONE WOULD HOPE BUT UNFORTUNATELY - NO!!! Even after all the prep work and coats, with proper drying times in between, areas of paint on the inside of the cabinet peeled off in chunks when I took the tape off that I used when painting the back wall of the cabinet. I'm not exaggerating when I say I cried! I almost scrapped the whole project and swore off painting laminate for good...but once my blood pressure came back down to normal I decided to head to the Depot to buy a sample of flat paint to match the Dark Walnut spray paint, grabbed a paint brush, and went to work.
All that said, the cabinet and the mirror are finally done. Yea!!!! Although I wasn't able to find a wallpaper that I liked, thanks to Pinterest I found something I liked even better. It would give me the pop of color I was looking for, and I would be able to match the green in my towels perfectly. It also gave me a fabulous finish for the glass in the door...thanks to Stacey's idea of replacing the glass. What is this fabulous find you ask? Cutting Edge Stencils!!!!
I chose the Casablanca Craft Stencil and tried using it on the back of the cabinet with a Behr Ultra Flat Sample in "Wasabi Powder." Unfortunately, the size of the stencil wasn't conducive to working in an enclosed area like inside a small cabinet and I just couldn't get the stencil to lay flat...even with spray adhesive. So I ended up painting the inside a solid green. But don't be surprised if you see me buying a sheet of plywood, stenciling the flat piece with Dark Walnut and Wasabi Powder, and replacing the current backing on the cabinet in the near future! :) I did use the stencil to etch the new glass I bought using a tutorial I found on Make It and Love It. The stencil definitely works better on flat, open surfaces!! And I would definitely recommend a lighter base color with a darker stencil color. With the dark brown base it was hard to get good coverage with the green. You have to use very light coats to prevent bleeding and I couldn't get good coverage. On their website they recommend using Benjamin Moore "Aura" paints because it has great coverage...may try that next time too!
To top it off I found the exact door pull I wanted at MyKnobs.com.
So even though it took longer than I expected, I am thrilled with how the cabinet turned out!! Take a look and let me know what you think...
The mirror was much easier than the cabinet, thank goodness!! I ended up priming it and painting it with the same spray paint I used on the cabinet. Then I went over it with my Mercury Glaze from Martha Stewart. I'm still not 100% sure I'm digging how it turned out. I'm thinking I might do one more coat of the glaze to lighten it up a little bit, but I decided I should wait a little bit to see if it grows on me. I don't hate it...I just don't know that I LOVE it!! Do you???
With all this complaining, I almost forgot...The Crates!! I did two like in the Master Bath but I'm thinking I need one more. The toilet in this bathroom is shorter and farther from the wall so I'm thinking a third one will be good...especially since storage is such an issue in this bathroom. In my "spare time" (a.k.a. someday...) I plan on making some fabric boxes to fit in the top and bottom crates (two each) so I can use them to store less attractive goodies (i.e. Make Up and other primping supplies). I ended up staining them with the Espresso Stain but decided not to do the Mercury Glaze. I liked how the darker stain went with the dark cabinet. Plus, since this bathroom is not nearly as "Bling!" as the Master, I thought the glaze might just be overkill. Do you agree?
Wow! This assignment really kicked my butt!! Maybe I should take it easy next week???
Wednesday, February 22, 2012
Week 7 Assignment - Results
What a week!! It sure has been a roller coaster! It started with a call from a headhunter with a position I can only describe as my "dream job". To make a long story short (well, as short as possible), when my oldest was born I walked away from a job I loved to become a stay home mom. I have been so blessed that with some purse-tightening we have financially been able to manage on one income for the last four and a half years. The deal was I would go back to work once Brenna started Kindergarten two years from now, but I felt that if I didn't at least look into this opportunity I would regret it down the line. As the headhunter said, I'd either hate them and the job and my decision would be easy...or I'd love them and the job and while it would be a little harder the decision would be mine to make. Turns out there was a third option. I'd love them and the job but they wouldn't love me. :( I can't tell if I'm more disappointed or relieved, but I can say that my ego is a bit bruised. I've been fortunate in my life to have only interviewed for one job (now two) that I haven't been offered. But once my ego bounces back I know I will still have the best job in the world...getting to stay home and raise my two beautiful children!! And I still get to give myself some exciting assignments!
Speaking of assignments, this weeks assignment was a fun little diversion from all this serious interview preparation! I ended up making two sets of pillowcase dresses (I'm finishing a third but Brenna has already claimed it!) and they sure are cute! They are pretty easy to make once you get comfortable with the process, so if you are going to give them a try I recommend making one with some scrap fabric first. The hardest part is putting the bias tape on the arm holes, so if you do try and make one and get stuck let me know. I'd be happy to post a "how to" on the bias tape!! :)
Take a look!
Speaking of assignments, this weeks assignment was a fun little diversion from all this serious interview preparation! I ended up making two sets of pillowcase dresses (I'm finishing a third but Brenna has already claimed it!) and they sure are cute! They are pretty easy to make once you get comfortable with the process, so if you are going to give them a try I recommend making one with some scrap fabric first. The hardest part is putting the bias tape on the arm holes, so if you do try and make one and get stuck let me know. I'd be happy to post a "how to" on the bias tape!! :)
Take a look!
Monday, February 13, 2012
Week 6 Assignment - Results...Well, not really...:(
Well, it was another challenging week in the DIY department around here. Thanks to some rainy days and more than a couple unsuccessful nap times, I didn't get nearly as much done in the Guest Bathroom as I had hoped. :( While I managed to get the ceiling and walls painted, that's really all I was able to complete. On the bright side, I am thrilled with the color. It's lighter than I thought it would be, but I absolutely love it! It totally brightens up what was once a rather dark and dreary bathroom...take a look!
One important lesson I learned this week...If you are using the Glidden Trim Paint and don't have the luxury of painting it in your garage, DON'T paint your new trim until it's up on the wall!!! I regrettably learned the hard way that because of how long it takes to dry, it is virtually impossible to paint it before you install it without completely messing it up while it's drying. While it's nothing a bit of sanding and primer can't fix, it's just another frustrating setback.
Unfortunately, I have to take a short break from finishing the Guest Bathroom because I have "homework" to do for Bradan's Kindergarten that he's (hopefully, we find out this Friday) going into next fall...
One important lesson I learned this week...If you are using the Glidden Trim Paint and don't have the luxury of painting it in your garage, DON'T paint your new trim until it's up on the wall!!! I regrettably learned the hard way that because of how long it takes to dry, it is virtually impossible to paint it before you install it without completely messing it up while it's drying. While it's nothing a bit of sanding and primer can't fix, it's just another frustrating setback.
Unfortunately, I have to take a short break from finishing the Guest Bathroom because I have "homework" to do for Bradan's Kindergarten that he's (hopefully, we find out this Friday) going into next fall...
Monday, February 6, 2012
Week 5 Assignment - Results
It's a good thing I decided to take it easy this week...I was definitely not in the zone! :) But I did manage to finish my projects, despite the fact that I think I spent more time planning my next months worth of projects. Guess that's why I'm blogging to keep me on track!
The bread box was more of a challenge than I thought it would be...it was determined to remain a blonde, but I was more determined to make it a brunette!! While sanding it down to prepare it for staining, I realized it wasn't solid wood but was veneer instead. I tried staining a small bit on the back but it just wouldn't take...so I resorted to primer and spray paint. I had some leftover Espresso spray paint from my Family Sign assignment which did the trick...but I still wasn't in love with it. So I played around with some Black Antiquing Glaze and ta da!! Not what I had in mind exactly but it will do. Take a look...
A couple of tricks I learned:
1) Have the folks at the Depot cut your MDF to a size slightly larger than the interior of your bread box. That way you can sand down the edges as needed for a tight fit.
2) For the notches in the MDF for the cords, I used a straight edge and a box cutter. It was time consuming but gave me nice, straight edges for the openings. Do this BEFORE painting your MDF.
I love the fact that I don't have a bunch of charging cords slinking around my kitchen counter!! Definitely worth the effort!
And our Mommy Play Date was sooo much fun!! I think we may have had more fun than the kids! We had to get a little creative with my planter box because my window sill where I wanted to put it was only 4" wide, but we found some Alder 1/4" x 6" sheets that did the trick. Terri was making hers for her mantle so she was able to use 1" x 6"s in Pine. I was amazed at how easy these were to make...even if you don't have access to power tools! Most home improvement stores will cut wood to your specifications (within reason) so all you need to do is drill a few holes and install a few screws. I think the hardest part was drinking all the frappuccinos!
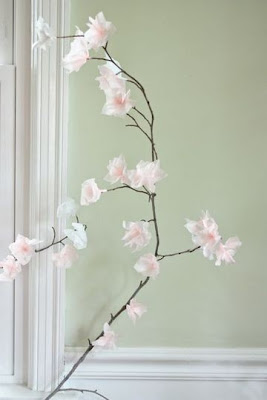
Now to fill those lovely frappuccino bottles, I decided I wanted the look of cherry blossoms...but I HATED how the stems looked on the silk ones I found. But not to fear, Pinterest is here!! Found this pin on one of Tracy's boards from Apartment Therapy and went to work...
Easy?...YES!! Tedious?...ABSOLUTELY!! You may notice that I only finished 3 of the 5 branches. This is because I decided to stop before poking my eyes out with my scissors! :) I can't imagine how this woman did a whole room of them?? I think this is a project best completed with friends and accompanied by your favorite beverage! So I will take a little break and maybe finish the last two branches with a Blue Moon! Anyway...here's what I've done so far...
Now that I've taken a week off...guess it's time to get back to work!
The bread box was more of a challenge than I thought it would be...it was determined to remain a blonde, but I was more determined to make it a brunette!! While sanding it down to prepare it for staining, I realized it wasn't solid wood but was veneer instead. I tried staining a small bit on the back but it just wouldn't take...so I resorted to primer and spray paint. I had some leftover Espresso spray paint from my Family Sign assignment which did the trick...but I still wasn't in love with it. So I played around with some Black Antiquing Glaze and ta da!! Not what I had in mind exactly but it will do. Take a look...
A couple of tricks I learned:
1) Have the folks at the Depot cut your MDF to a size slightly larger than the interior of your bread box. That way you can sand down the edges as needed for a tight fit.
2) For the notches in the MDF for the cords, I used a straight edge and a box cutter. It was time consuming but gave me nice, straight edges for the openings. Do this BEFORE painting your MDF.
I love the fact that I don't have a bunch of charging cords slinking around my kitchen counter!! Definitely worth the effort!
And our Mommy Play Date was sooo much fun!! I think we may have had more fun than the kids! We had to get a little creative with my planter box because my window sill where I wanted to put it was only 4" wide, but we found some Alder 1/4" x 6" sheets that did the trick. Terri was making hers for her mantle so she was able to use 1" x 6"s in Pine. I was amazed at how easy these were to make...even if you don't have access to power tools! Most home improvement stores will cut wood to your specifications (within reason) so all you need to do is drill a few holes and install a few screws. I think the hardest part was drinking all the frappuccinos!
Now to fill those lovely frappuccino bottles, I decided I wanted the look of cherry blossoms...but I HATED how the stems looked on the silk ones I found. But not to fear, Pinterest is here!! Found this pin on one of Tracy's boards from Apartment Therapy and went to work...
Easy?...YES!! Tedious?...ABSOLUTELY!! You may notice that I only finished 3 of the 5 branches. This is because I decided to stop before poking my eyes out with my scissors! :) I can't imagine how this woman did a whole room of them?? I think this is a project best completed with friends and accompanied by your favorite beverage! So I will take a little break and maybe finish the last two branches with a Blue Moon! Anyway...here's what I've done so far...
Now that I've taken a week off...guess it's time to get back to work!
Subscribe to:
Posts (Atom)


-001.jpg)